In a web application or any website login module is the mandatory and the most important feature. This is required in any type of application whether it’s an admin dashboard, a CRM or an ecommerce website. In this tutorial we will learn how to first design a login form in Html. I will be using bootstrap , a popular Html and Css framework to design the login form.
Login Form Basics
A basic login form has generally has username, password and a submit button. Whenever a user submits username and password it gets verified with the data stored in the database. After verfication if the credentials are correct then the user is allowed to login in the system. So we need a database , a usertable to store thecredentals for the users, a interface for login system and a backend logic for implementing the logic functionality. For implementing the logic functionality we will be using PHP.
How to design a login form ?
First locate to your localal installation folder xampp/htdocs and create a folder login-module .Then create a html page and save it as login.php .Check the code below for login.php page .
<!DOCTYPE html>
<html lang="en">
<head>
  <meta charset="UTF-8">
  <meta name="viewport" content="width=device-width, initial-scale=1.0">
  <title>Document</title>
</head>
<body>

</body>
</html>
Now we need to include bootstrap cdn so that we can use it’s classes and features in our form . Check the code below :
<!DOCTYPE html>
<html lang="en">
<head>
  <meta charset="UTF-8">
  <meta name="viewport" content="width=device-width, initial-scale=1.0">
  <title>Document</title>
  <link href="https://cdn.jsdelivr.net/npm/bootstrap@5.3.6/dist/css/bootstrap.min.css" rel="stylesheet" integrity="sha384-4Q6Gf2aSP4eDXB8Miphtr37CMZZQ5oXLH2yaXMJ2w8e2ZtHTl7GptT4jmndRuHDT" crossorigin="anonymous">
  </head>
</head>
<body>
<script src="https://cdn.jsdelivr.net/npm/bootstrap@5.3.6/dist/js/bootstrap.bundle.min.js" integrity="sha384-j1CDi7MgGQ12Z7Qab0qlWQ/Qqz24Gc6BM0thvEMVjHnfYGF0rmFCozFSxQBxwHKO" crossorigin="anonymous"></script>

</body>
</html>
Now create form with fields username ,password and submit button .Use method ‘POST’ to post data for this form .Add this form in the body section of the html page .Check the code below :
<div class="container">
<div class="row border m-3 p-3">
<h3>Login</h3>
<form name="frm" action="" method="POST">
<div class="mb-3">
<label for="exampleInputUsername1" class="form-label">Username <span class="alert-danger">*</span></label>
<input type="text" class="form-control" name="username" id="exampleInputUsername1" required>
</div>
<div class="mb-3">
<label for="exampleInputPassword1" class="form-label">Password <span class="alert-danger">*</span></label>
<input type="password" class="form-control" name="password" id="exampleInputPassword1" required>
</div>
<button type="submit" class="btn btn-primary">Submit</button>
</form>
</div>
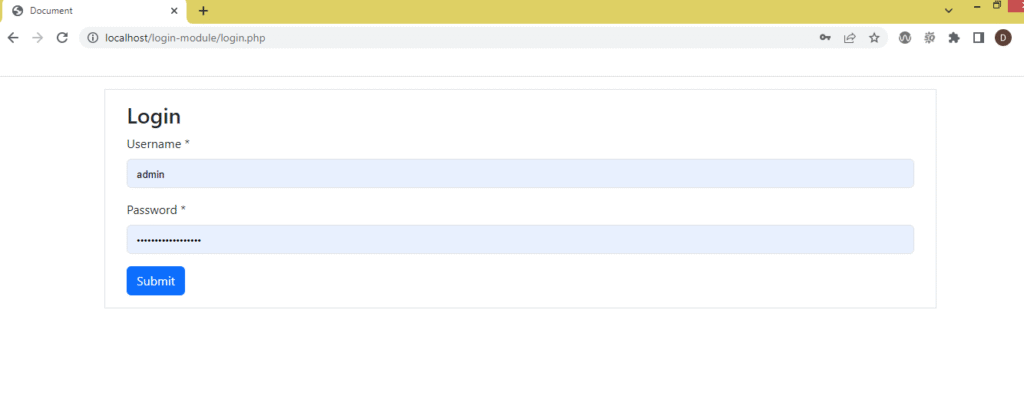
</div>Login form screen will be displayed like below :
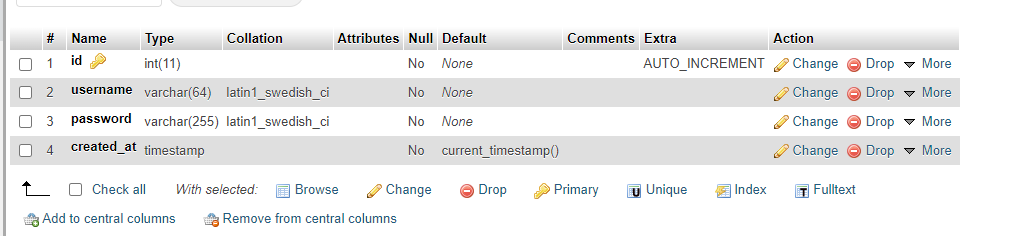
Now we need a database and a table to store user details . So create a database user_module and add a table user_lists using below sql code :
CREATE TABLE `user_module`.`user_lists` ( `id` INT NOT NULL AUTO_INCREMENT , `username` VARCHAR(64) NOT NULL , `password` VARCHAR(255) NOT NULL , `created_at` TIMESTAMP NOT NULL DEFAULT CURRENT_TIMESTAMP , PRIMARY KEY (`id`)) ENGINE = InnoDB;
The table structure looks like below.Please see the screensot below:
Create a user with username as admin and password as phpguruacademy . Check the code below :
INSERT INTO `user_lists` (`id`, `username`, `password`, `created_at`) VALUES (NULL, 'admin', 'phpguruacademy', current_timestamp())After a form is submitted the data for username and password input fields which are added are matched against the values stored in table user_lists.If a matching record is found user is redirected to dashboard page .
Place the below code for Login functionality on the top of the page .
<?php
session_start();

// Database connection
$conn = new mysqli("localhost", "root", "", "user_module");

// Check connection
if ($conn->connect_error) {
    die("Connection failed: " . $conn->connect_error);
}

$login_error = "";

if (!empty($_POST['username']) && !empty($_POST['password'])) {
    $username = trim($_POST['username']);
    $password = trim($_POST['password']);

    // Query to check user
    $sql = "SELECT * FROM user_lists WHERE username = '$username' AND password = '$password'";
    $result = $conn->query($sql);

    if ($result->num_rows === 1) {
        $_SESSION['username'] = $username;
        header("Location: dashboard.php"); // Redirect after login
        exit();
    } else {
        $login_error = "Invalid username or password!";
    }
}
?>
To test the login functionality now add username as admin with incorrect password.Then you will see the below screen:

Now enter correct username and password and click on submit button. You will see the below screen:
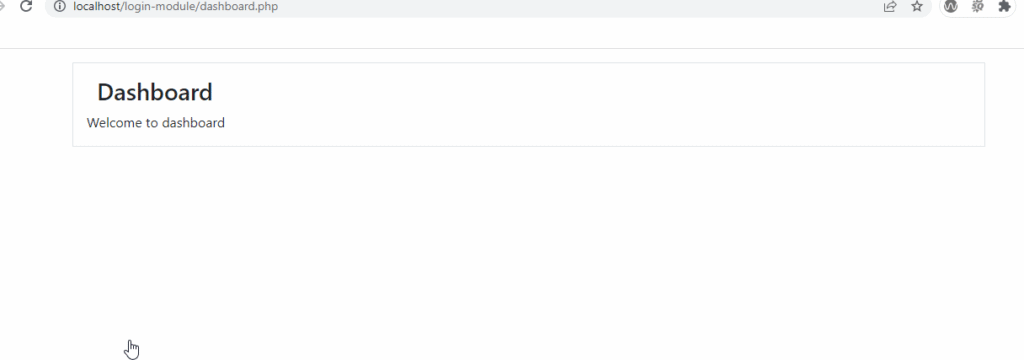
Dashboard is the page where the user is redirected to after successful login . Find the below code for dashboard page:
<!DOCTYPE html>
<html lang="en">
<head>
  <meta charset="UTF-8">
  <meta name="viewport" content="width=device-width, initial-scale=1.0">
  <title>Document</title>
  <link href="https://cdn.jsdelivr.net/npm/bootstrap@5.3.6/dist/css/bootstrap.min.css" rel="stylesheet" integrity="sha384-4Q6Gf2aSP4eDXB8Miphtr37CMZZQ5oXLH2yaXMJ2w8e2ZtHTl7GptT4jmndRuHDT" crossorigin="anonymous">
  </head>
</head>
<body>

<div class="container">
<div class="row border m-3 p-3">
<h3>Dashboard</h3>
Welcome to dashboard
</div>

</div>
<script src="https://cdn.jsdelivr.net/npm/bootstrap@5.3.6/dist/js/bootstrap.bundle.min.js" integrity="sha384-j1CDi7MgGQ12Z7Qab0qlWQ/Qqz24Gc6BM0thvEMVjHnfYGF0rmFCozFSxQBxwHKO" crossorigin="anonymous"></script>
</body>
</html>