WordPress plugins are a powerful features which allow you to extend the functionality of your code or customize any section of your wordpress site. If you want to create a plugin for your personal website or you want to simply learn it to code then you have landed on right page.This step-by-step guide will walk you through the process of plugin development, including file structure, hooks, and functions. Whether you’re building a custom WooCommerce extension or just starting with plugin coding, this tutorial will help you master the basics.
What is WordPress Plugin ?
A WordPress plugin is a piece of code that groups several functions inside a single file. Developers use plugins to change existing features of a website or add new ones. Plugins enhance or modify functionality and content without touching WordPress core files. You can use them for small tasks, such as changing a page title, or for larger tasks, like adding an FAQ section in the admin area and displaying it on the frontend.
Prerequisites:
- Basic knowledge of PHP,HTML,CSS
- A local environment using wordpress site
- Working knowledge of wordpress and knowledge of themes and core functionality
Step 1: Setup your plugin folder in wordpress
The plugins folder is present inside wp-content/ folder.This folder is the main folder which contains all the plugins for a website.To create your desired plugin the very first step is to create a folder with your desired plugin name inside plugins folder.Now say we want to create a plugin which will add notice to the top of the home page in a website .So for this we need to create a folder named as top-notice with top-notice.php inside it as it’s main plugin file and place this folder inside wp-content/plugins folder .
See the below structure of the plugin we want to create:
\wp-content\plugins\top-notice
\wp-content\plugins\top-notice\top-notice.php
Step 2: Add header to wordpress plugin main file
We have added the top-notice plugin folder .
Now we need to add header section to the main plugin file.
The header of the plugin file contains metadata. WordPress uses this metadata to recognize the plugin, display its details in the admin area, and handle activation or deactivation from the admin side.
As you can see, we have defined a few pieces of data here, which we explain below:
1.Plugin Name -Name you want to keep for your plugin
2.Description :Description of the plugin i.e what does the plugin do.
3.Version: Current version for the plugin
4.Author: The person who created plugin
5.License: License which is valid for this plugin
For example below is the code to add the header part in the main plugin file.
/**
 * Plugin Name: Top Notice for Homepage
 * Description: A plugin to display a top notice on the homepage.
 * Version: 1.0
 * Author: Your Name
 * License: GPLv2 or later
 */
Screenshot for header part of plugin with description below:

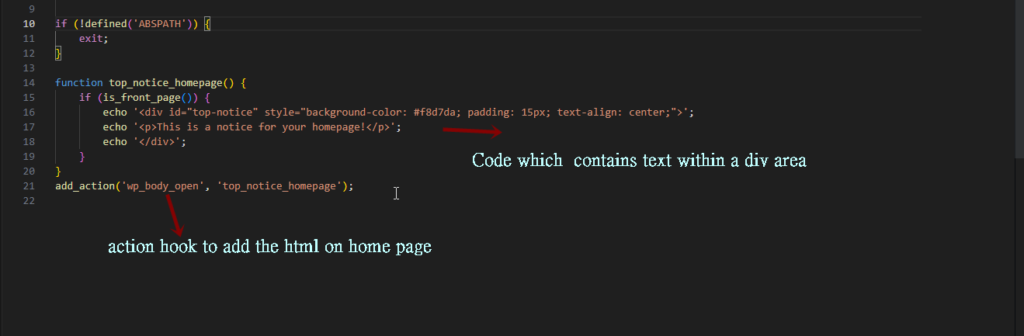
Step 3: Add code to plugin file
After adding the header section, add the following code to the plugin. This main code adds the functionality for the plugin.
if (!defined('ABSPATH')) {
    exit;
}

function top_notice_homepage() {
    if (is_front_page()) {
        echo '<div id="top-notice" style="background-color: #f8d7da; padding: 15px; text-align: center;">';
        echo '<p>This is a notice for your homepage!</p>';
        echo '</div>';
    }
}
add_action('wp_body_open', 'top_notice_homepage');
Let us understand the code step by step.
if (!defined('ABSPATH')) {
    exit;
}
This code tells WordPress to check the file and block anyone from opening it directly without permission.
function top_notice_homepage() {
    if (is_front_page()) {
        echo '<div id="top-notice" style="background-color: #f8d7da; padding: 15px; text-align: center;">';
        echo '<p>This is a notice for your homepage!</p>';
        echo '</div>';
    }
}
Now we created a function named as top_notice_homepage() and have enclosed it within if block with is_front_page() condition check as shown above in code snippet . The is_front_page condition ensures that WordPress adds the code only to the homepage.
In this function, we define HTML data with the text we want to display as a notice. Whenever we call this function, it returns the HTML notice. To render this notice at the top of the homepage, we use action hooks.
What are action hooks
WordPress uses action hooks as triggers to add code that modifies or adds functionality without changing the core files. We use these action hooks to trigger a custom action at a specific point.
Here we will use the action hook to trigger our function and in return which will display the notice on home page.See the code snippet for this below
add_action('wp_body_open', 'top_notice_homepage');Here add_action function attaches the custom function top_notice_homepage() with action hook wp_body_open.
This means when wordpress encounters this action hook it will run the custom function as well.This action hook is triggered immediately after opening of <body> tag in Html structure.
This action hook calls the custom function and insert the content of custom function.
Screenshot for the code of plugin to display notice below:
Step 4: Activate the plugin
After you add the code to the plugin file, activate the plugin to make it work.
So we need to go to admin area.Now find Plugins section in left side menu of admin panel.
Find the Top Notice for Homepage plugin and click the Activate link. WordPress activates the plugin and shows a confirmation message above.
See the screenshot below:

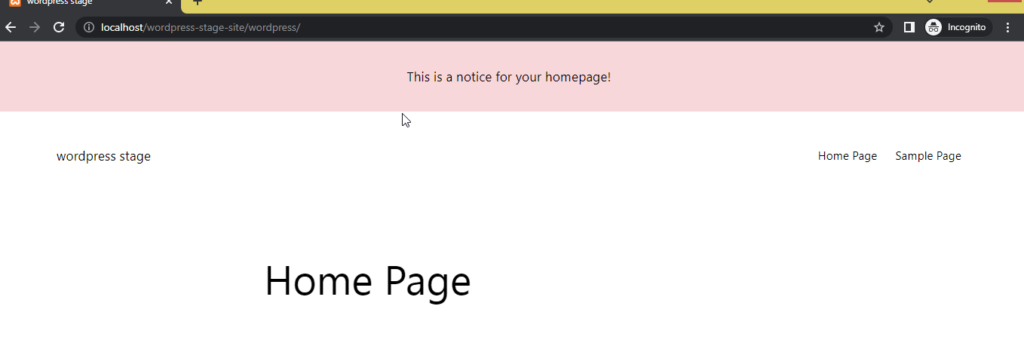
Step 5: Test the plugin
Now we have created the plugin and activated it but we need to test it.
Navigate to your local installation url .Here in I have local installation in http://localhost/wordpress-stage-site/wordpress
Click to this url and you can see the notice on home page.
See the screenshot below:
Congratulations ! You’ve created a basic wordpress plugin from scratch! Now feel free to extend it’s functionality as per your needs.
You can get some customized plugins here .
You can explore thousands of free plugins in the WordPress.org Plugins Directory.
Few of the best WordPress and WooCommerce plugins are Yoast SEO, WPBakery, All in One WP Migration, Low Stock Notifier, Quick Order Export to MessagingApp for WooCommerce, Gravity Forms, WooCommerce .
Happy Coding !